One should never underestimate settings in Power Query. So let’s have a look on few recommendations which can save you lots of pain in future. This articles covers only the most relevant settings (not all). Settings not covered in this articles are usually self-explanatory.
How to Navigate to Power Query Settings
In Power Query, follow these steps:

A new settings window will load.
Global vs. Current Workbook Settings
It is important to distinguish between Global and Current Workbook settings:
- “GLOBAL” settings will affect ALL the projects you create in Power Query
- “CURRENT WORKBOOK” settings will affect only the current Excel file
As you can see, “GLOBAL” settings are covering more areas (Data Load, Query Editor, Security, Privacy, Account, Diagnostics) than “CURRENT WORKBOOK” (Data Load, Regional Settings, Privacy).

Global Settings
Data Load
Data Load settings affect how the queries are loaded. By default, all the query will be loaded to your standard Excel sheets when you close Power Query window. If you have e. g. 50 queries, they would be loaded to 50 separate Excel sheets. This is most of the time unnecessary since only few queries are the important ones which need to be exported to Excel. As a result, I started to use this setup:

I am unticking “Load to worksheet” and “Load to Data Model” and I am only loading selected queries to Excel sheet manually. How to load queries to Excel manually? There few options. When your are in Power Query, follow these steps:

When you are already in standard Excel, you can also load results of your queries from there. Find “Show Queries” depending in your Excel version and then follow these steps:

Sometimes, you will need to “unload” or get rid of some of the the loaded queries which were loaded to Excel by accident. Here is the sequence of loading and “unloading”:
Alright, so that’s it for the loading.
Cache
“Keep calm and clean your cache”. Cleaning your Power Query cache when something is not working as expected can be as useful as restarting your PC. So how do you clean your Power Query cache? Again, navigate to GLOBAL>Data Load. The bottom part of the window is related to cache. Press the magic button “Clear cache”. Nothing will happen at first sight. In the background, you are forcing Power Query to reload all the information.
This is particularly useful when working with large Google Sheet files connected as Excel files. Quite often, I get “error message” that column XYZ was not found in the connected Google Sheet file while I know that the column is present in the Google Sheet file. This is either error in Power Query OR in Google Sheets. The solution is to clear cache and you queries will run smoothly again.

Query Editor
Query Editor option are related to how Power Query looks and what elements it displays. I use these settings:

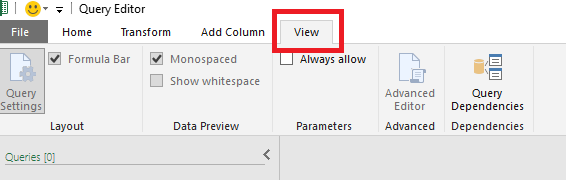
Nearly the same options can be also found on “View” tab:
You may be wondering what is “Formula Bar”. It’s this part:

Formula bar converts the actions which you trigger via buttons into Power Query M language. Sometimes, it’s just easier to edit the code by simple typing into code in the formula bar than re-doing a step again when changes are needed. The trouble is that there is no “Back” button, so when you broke the code of that step, you will need to remove the step (not entire query) and do it again.
I like to use the “Monospaced Font” option because all the letters have equal width so it’s easier to quickly evaluate by looking whether all the words in a column have the same length. It takes a while to get used to monospaced font but I found it useful. Some people still prefer “normal font”.
So what is the real visual difference between “normal” and “monospaced” font? See below.

Privacy
Without too much talking, set your Privacy to “Always ignore Privacy Level Settings”. Basically, this option will prevent LOTS of error messages from appearing. They would usually come up when combining data from various data sources. Those errors usually also make no sense to end user. Ticking this option will save you some googling. 🙂

Current Workbook
Data Load
Yes, that’s right, there are 2 Data Load setting – 1 in GLOBAL settings, 1 in CURRENT WORKBOOK settings. However, options which can be changed differ.
The important option in CURRENT WORKBOOK Data Load is “Background Data”. You can tick or untick “Allow data preview to download in the background”. When ticked, this feature allows to cache ALL the queries within the file in the background. This has 2 implications:
- You wait less time when switching between queries (or steps within the queries) in Power Query => positive
- Power Query consumes more RAM and CPU power => negative
Imagine you have a very complicated file with lots of queries and very large inputs files (e. g. 3 CSV files above 1 GB). Your PC will probably run at 100% CPU and Power Query will consume >50% you RAM. It may get to the point that your PC will be slow to respond. The quick fix is to untick this option so Power Query only loads the necessary data for the current query. The downside will be that Power Query will be slower BUT it will operate reliably.

Regional Settings
This is a quick one. You can set Regional Settings which affect how Power Query manipulates dates, currencies and other features specific to regions & countries. So e. g. when you live in Czech Republic, you can choose “Czech (Czech Republic)”. Power Query will then treat this date 1/10/2017 as October 1st, 2017 and not as January 10th, 2017.

Summary
The right settings are essential to having smooth Power Query experience. Don’t underestimate it and spend 30 minutes on choosing the best options for your needs.