The best function of all times. IF function. Everyone has heard about it but only few can use it. So how does IF function work in Power Query?
Well, there is a button for that. As usual. You will be able to complete basic IF conditions purely with the “IF function help wizard”. For the more complex conditions and actions, you need to either write your own IF function from scratch or edit an already existing one.
***Tip: Have a question? Ask in the comment section below or in this Facebook group. You can also sign up for our free newsletter.***
***Do you feel like you need more help? We can help you with PPC Automation and/or with your reporting under our new project MythicalReports.com here.***
So let’s have a look to the easier option today.
IF Function Inserted via “IF Function Help Wizard”
Assume, you have a Power Query table such as this:

And you need to add a new column called “Segment”. This new column should refer to “Campaign” and decide whether the campaign is “Brand” or “Generic” so the intended result looks like this:

So let’s start. Navigate to “Add Column” tab and press “Conditional Column” button:

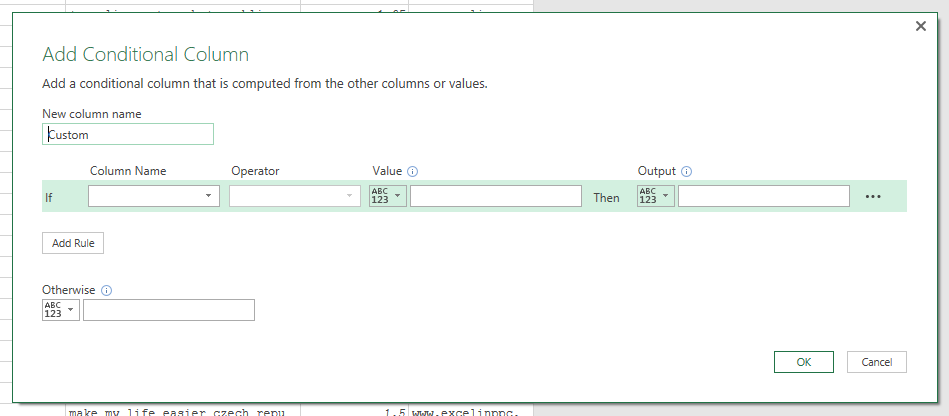
Helper IF function window will appear. Let’s a have quick look on what you see:
- New column name = that’s how you want to name your new column you are about to add
- Column Name = select which column values will be used in the condition
- Operator = available conditions you can check for (Contains, Equal, Starts With, Ends With…)
- Value = part of the condition, e. g. value against you are checking values from “Column Name” selection
- Output = what happens when condition is met
- Add Rule = button for adding more & more rules
- Otherwise = what happens when condition is not met
So let’s take it step by step.
As I said, we will be checking values in “Campaign” column for “Generic” or “Brand” text string. In this window, you need to define the conditions then what happens when conditions are met. The final setup in our case would look like:

A new column “Segment” will be be added:
It is now worth to have a look how this operation is recorded in Power Query M language. Power Query just drops everything into 1 row. It is not very user friendly. You may want to make the code look nicer and there is an easy fix to it.

You can simply edit the code by wisely adding new line breaks while holding Shift+Enter. This edited formula below now does not look that bad, does it?

There you have. IF function is very easy to do in Power Query with the helper wizard – something you don’t really find in standard Excel.
Important Notes
You can add a lot of conditions. I don’t know the exact limit, but you should be able to add around 200 rules via “Add rule” button.
There are multiple operators available. They will probably cover most of your needs if you are just starting with Power Query.

When you define you conditions, you don’t have to always reference a written text string. You can reference another column by “Select a column”:

Similarly, “Output” can be also another column:

Same as “Otherwise” option when none of the condition is met:

And that’s it! Don’t be scared and try yourself 🙂
DZ
***Tip: Have a question? Ask in the comment section below or in this Facebook group. You can also sign up for our free newsletter.***
***Do you feel like you need more help? We can help you with PPC Automation and/or with your reporting under our new project MythicalReports.com here.***